GETTING STARTED WITH THE VIDEO SYNTHESIS ECOSPHERE DESKTOP
0. If this guide and/or these public domain open source video tools are super useful for you, please consider tossing some scratch my ways! It is an ever increasing amount of work to keep these apps up and running for everyone, even in their shambolic haphazard states. The more income I can generate through donations means the more free time I have to keep working on these free and open source tools! scroll down to the bottom of this page for an easy link to send some cash to my paypal! And/or consider signing up for my patreon, i’ve set up a goal for if we reach 1200usd where i’ll get started on creating one click installers for video waaaves for windows, osx, and linux! If you are looking for info on how to get NDI working with your setup click here. If you have any issues with these instructions not working for you, please head over to one of the forums (discord or scanlines.xyz) and with lots and lots of details ask for some assistance.
1. Download and then expand the folder for your operating system
OSX (current 2.718 beta) 8/31/22
WINDOWS/LINUX (current 2.718 beta) 8/31/22
OSX( older 2.5 version)
WINDOWS/LINUX( older 2.5 version)
2. Follow the instructions below for setting up a IDE
OSX-XCODE (i kind of recommend using an older version of Xcode than the one that the App store pushes on you, anything before 11 is probably dope. to find older versions of Xcode check out https://xcodereleases.com)
WINDOWS-VS
LINUX and LINUX
3. Download and install NDI tools if yr interested in using NDI for screen grabbing and network sharing. WARNING: by using ndi you are potentially sharing your screen with any other NDI users on your local area network (i.e your roomates, other randos at the coffee shop you are at, that weirdo who sits on your stoop and snakes yr wifi because your password is Love123 (apparantly 'love' is a really common password?? or at the very least this is a prominent cyberuban legend of yore). If this idea bothers you then either don't use NDI at all (all this stuff will run fine without it, you just are more limited on inputs) or take a moment to educat yourself about how to use NDI tools!
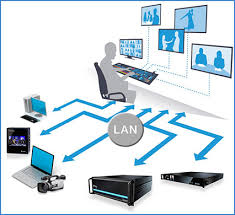
NDI can be used for just simple local screen grabbing (i.e. playing a clip in VLC and pulling into spectral mesh, using artificial life for texture mods into video waaaves) and also can be used for more complex video routing over multiple computers (i.e 3 laptops all on same wifi network each running artificial life, video waaaves, and spectral mesh and running each one as input into the next one). So i def recommend getting acquanited with NDI and the basics of VOIP (video over IP) because this kind of stuff can be a real game changer in a number of ways! More info on using NDI with the Video Waaaves Suite here!

If you are using windows you are now mostly set up to get started! First you’ll want to run the project generator to import each of the app folders. Open up the folder you downloaded, go to projectgenerator-vs and double click on projectgenerator.exe. Make sure to set the project path as the folder you are working in (i.e C:vws_2_718_winlin or wherever you placed your video waaaves suite folder), then click on “import” and one by one, import each of the folders within apps/myApps. Once you’ve finished that, go to apps/myApps and open up any of the folders and doubleclick on the file with the extension .vcxproj (i.e if i'm want to play artificial life i click on ARTIFICIAL_LIFE_1_1.vcxproj) to open up in visual studio. Once everything loads up you will see a little 'play' button around the top middleish portion of the screen, press that button and have fun!
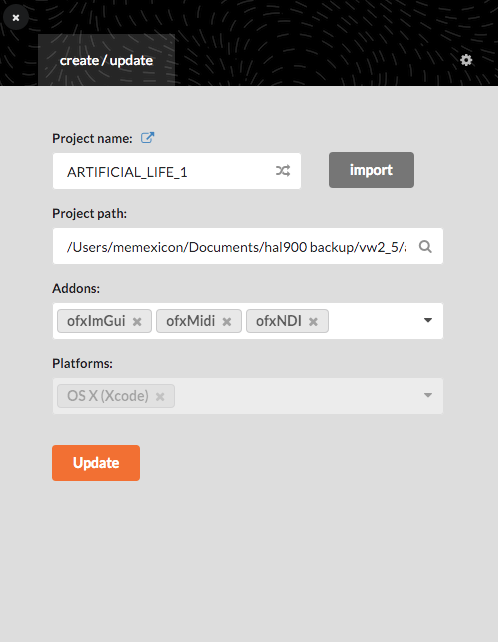
if you have OSX and are using xcode there might be a couple more steps depending on which version of xcode you are running. First off you will most likely want to go to the project generator and import each one of the apps.
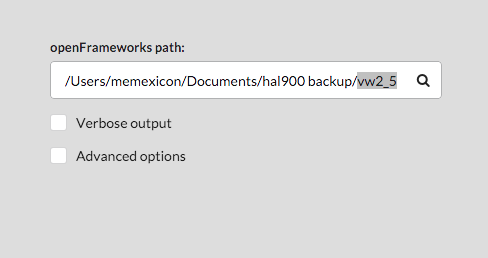
When it asks you to set 'openFrameworks path' you will click on the magnfiying glass and then select the vw2_718 folder you downloaded and expanded from step 1.
then select "create/update', click on 'import and one by one select each one of the project folders in the myApps folder and then click update!
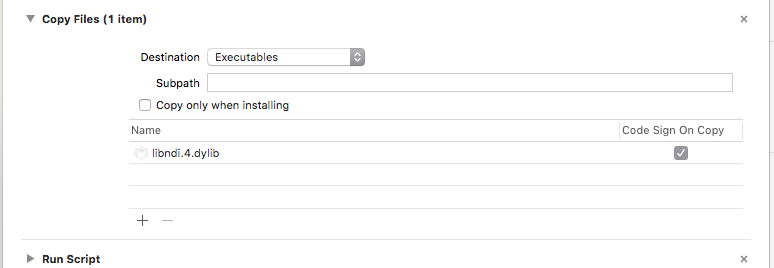
Next you will possibly get a 'sigbrt/dylib' related error one of the first times you run as well. To fix this you will click on the project name on the far right of the xcode window in blue to bring up a big pile of settings. Navigate to "build phases" and then click on "copy files".
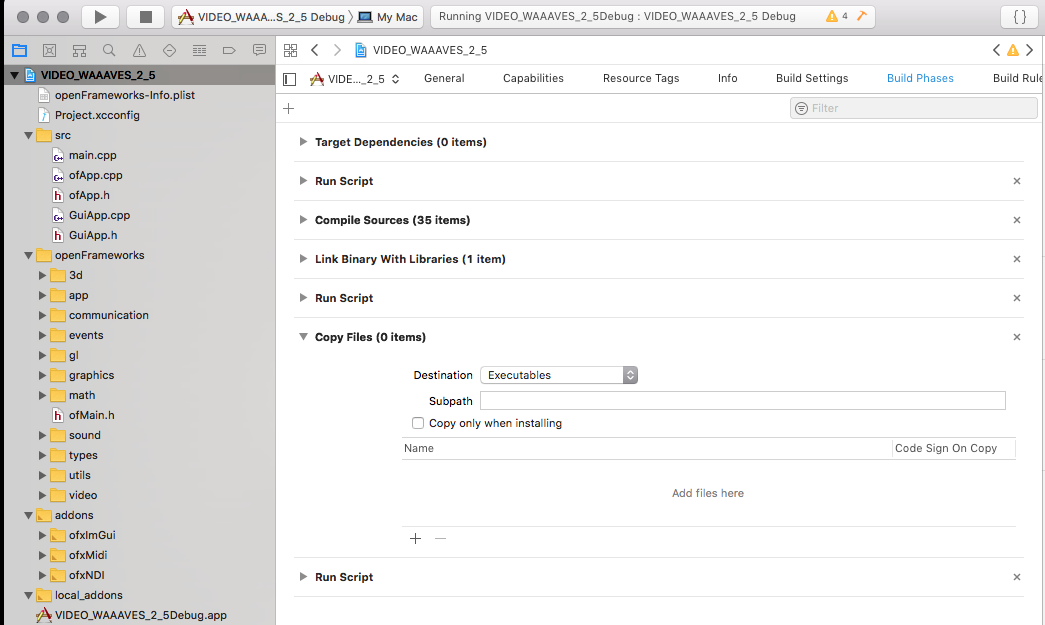
Change destination to 'executables' and then from within your project folder drag on over the libndi.4.dylib to the section with the little plus sign and click ok when the window pops up. you might only have to do this for one of the apps, you might have to do this with every one of the apps!

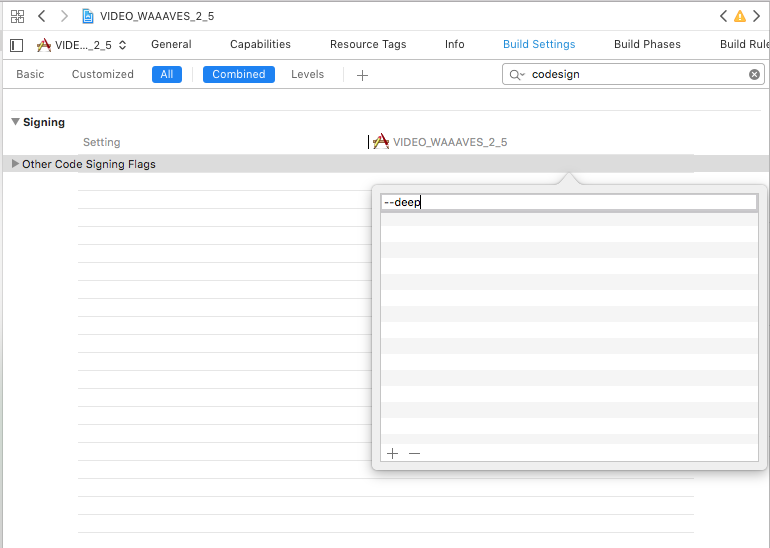
If you have a version of Xcode 11+ you will probably get a 'code sign' error, you can fix this by going back up where you were at the last step and instaed go to "build settings" and search for "codesign". Under "other code signing flags" you'll click and enter the text "--deep" and that should fix it!
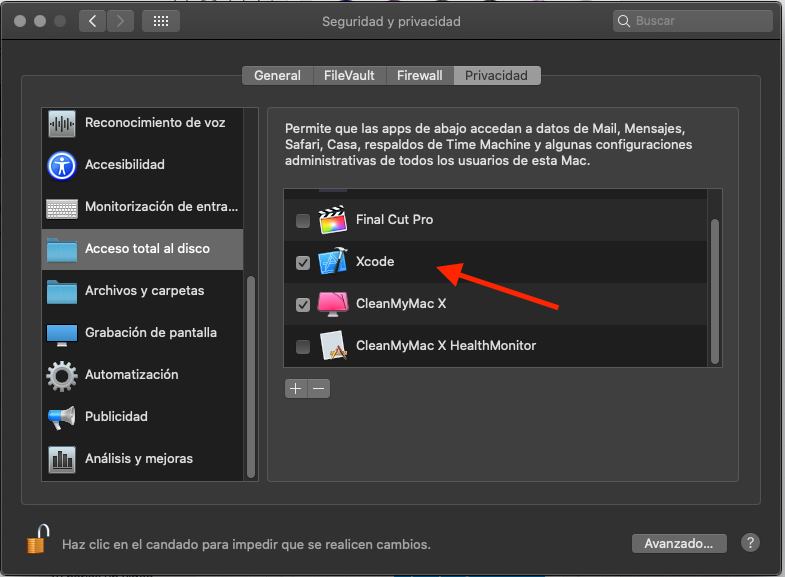
if you are running on catalina then you also might get an error to do with 'permissions'. ("command /bin/sh failed with exit code 74" or something similar) You'll need to go into your OSX settings and allow Xcode to have some more permissions on your disk because by default it doesn't have much.
LOOh yeah and also if you have an M1 mac and are running on big sur here is a tutorial that charlie pepper made and shared about how to get things running in that environment!
LOLOL that is just about it for known issues with getting started. If you’ve tried everything on this list and still are having errors, first do a double check and run through the list again. Then if you are still having issues head on over to either the facebook group or to scanlines.xyz and check out the threads i’ll be creating for listing bugs and issues with the 2.5 release. Please Please P*l*e*a*s*e do not DM me on social medias for help with this!
/?**********************?/
FREQUENTLY ASKED QUESTIONS
?**********************?
How to change resolutions
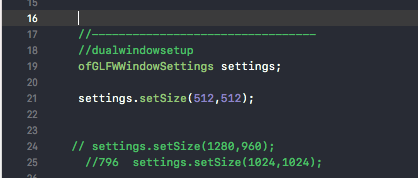
For most of these programs you will need to select your preferred resolution before you run the program. Go into src->main.cpp and where you see "settings.setSize(horizontal,vertical);" change the numbers in the parenthesis to your preferred resolution. You might need to play around with these numbers a bit to see how they play with your system, not everyone is going to be able to do 4k video waaaves especially if they are running artificial life at the same time! Note that changing the output resolution does nothing to change camera input resolutions, see below for more info.
How to change camera sources & input resolutions
Open up src->ofApp.cpp and search (cmd/ctrl + f) "cam1.setDeviceID". Each time you run one of these programs it will list the potential camera inputs and their device ids in the console, to select a specific camera as an input simply change the device ID in the parenthesis. You may run into problems trying to run multiple of these programs concurrently if they are trying to each access the same device ids (usually manfests as a SIGABRT error) so you might want to change the device ids in one of the program to other numbers to avoid this issue. its not a problem if you feed device ids that don't exist on your system (i.e. you only have 2 camera devices recognized and set the id numbers to 3 and 4).
Also good to keep in mind is that device IDS are not static within your system! Each time you plug/unplug a usb camera source and/or reboot your system the same cameras might end up having different device ids!
Also: you will note that below the .setId() line you’ll see a line that reads cam1.initGrabber(640,480); The numbers 640,480 are the camera resolution, if you want to change resolution to, say, 1280x720 you’d replace the numbers in the initGrabber parentheses with (1280,720), make sure to save the file, and then press the play button again.
How to use NDI
(just made another page for this)

How to use blackmagic cards for input
can be a little convoluted! for OSX you can try black syphon into syphon 2 ndi as a source. for any OS you can try using OBS to convert the blackmagic input into ndi or a virtual webcam input. For windows the blackmagic stream will sometimes show up as a UVC video input and you can just change the device id of cam1 or cam1 to bring it in.
OK that is about it for now! If theres more stuff that should get added to this guide then head on over to either the discord server, the facebook group or to scanlines.xyz and let us know!

If you appreciate the public domain open source software and educational materials I provide and can afford to spare some cash it is highly appreciated! The more donations I recieve the more time I have to spend on developing these resources! Please also consider subscribing to my patreon page as small amounts of regular income are appreciated as well! Or you could also support my ko-fi if you like getting stickers and stuff on a regular basis.