GRAVITY WAAAVES DIY INSTRUCTIONS

Download the Manual Here
find images for updates here
IMPORTANT ANNOUNCEMENT TO READ BEFORE YOU GET STARTED HERE:
My ability to devote time to development of projects on the scale of Gravity Waaaves is highly contingent on having financial resources independent of time sinking bullshit jobs and gigs. It took about 2 years from inception to completion to get GW out there in the world, and that was mainly because I could only spend like a week or two focused on GW development in between focusing on grinding for rent money. If you would like to show me that you appreciate the kind of work that goes into creating and sharing video art tools like this (as well as the VSERPI, and VSEDSK) and would like to see development continue at a faster pace I would highly recommend supporting my patreon, either via a one time donation or monthly subscription. This finished version of GW would have probably taken another 4 years to get out there if i didn’t have all of the financial support from all of my patreonians (patreonites? patroneoniologoists?) in fall of 2022 and if you’d like to see more stuff like this come out of my brain space and into the material world, your best bet is to sign up to give me small but regular amounts of monetary support! If you literally can’t afford it then don’t sweat it. But lets be honest, a pretty significant chunk of yous reading this can easily spare 10usd a month.
/~ SLIGHTLY but not significantly LESS IMPORTANT ANNOUNCEMENT TO READ ~/
a. “i have never put together a VSERPI on my own before”
b. “the word linux makes me feel slightly uncomfortable”
c. “i have a tendancy to abandon DIY projects whenever i get mildly confused”
If you identify with at least any two of these statements, this project might not be the best for you at this moment. I would recommend that you should not only have put together a VSERPI unit at least once, but you should have a pretty good understanding of what is actually going on with each step. At the very least, try and reach out to some folks via the VSE discord or scanlines.xyz for guidance. Putting together and operating GW is going to be a bit more involved and less forgiving than VSERPI, tho still quite easy in the grand scheme of DIY video art tools. Just want to make sure to get that warning out of the way before you go out and spend potentially hundreds of dollars on the required gear : )
DIY GRAVITY WAAAVES INSTRUCTIONS FOR REAL NOW
S * H * O * P * P * I * N * G L * I * S * T
(heres another link to the manual b/c people keep telling me they can’t find it)
CORE STUFFS
NVIDIA Jetson Nano Developer Kit (945-13450-0000-100)
The above is the best search term to use to find one of these. If you are unsure if a specific listing is the right one you will want to make sure you are picking up a nano dev kit that features SD CARD STORAGE and 4 GIGS OF RAM. There is not currently a great solution to getting something running on the EMMC storage version, nor have I tested anything with less than 4g RAM.
5V 4A barrel style power supply
It is not recommended at all to use the usb based power supply for GW. To enable DC barrel jack PSU on the nano you will need to fit a jumper to J48 on the Jetson Nano Developer Kit baseboard. The nano should come with a jumper and the header should be located very close to the barrel jack, do a quick google search if you are need help.
A Nice Solid Case
Something like this is probably a tiny bit overkill tbh, but its probably a good idea to keep your GW in something a bit more fortified than a cheapo plexi unit. The power/reset switches are a really nice bonus. The camera mounting, at least for now, won’t be used (tho its not impossible they can come in handy in the future so maybe keep them in a drawer). A fan is probably a good idea if you live somewhere thats pretty hot all the time, keep in mind that the fan is sold seperately. You might as well install the breakout board for the gpio pins as well while you are assembling this, maybe it’ll come in handy in the future?
32g SAMSUNG EVO micro sd card
Word on the street is that San Disk Ultra 32GB is good too.
ACTIVE DISPLAYPORT to HDMI ADAPTER
You’ll notice the jetson nano has 2 video outputs, 1 hdmi and 1 displayport. Long story short, unless you’ve got a native displayport monitor you plan on always using with the GW, you will almost definitely need an active DP to HDMI adapter. The following models are tested and known to work
accel
ivanky
benfei
caldigit
plugable
You might look around and find some other adapters that looks basically identical to any of those listed but cost less and want to try that one instead to save a couple of bucks. They probably aren’t active, it probably isn’t worth the time.
USER INTERFACE PERIPHERALS
Something worth noting is that there are a bunch of different ways you can control GW. Unlike the VSERPI, GW has a gui and you’ll need a little bit more than just a midi controller to get things done. There is a bit more flex on *some aspects* of user interface thingies, if you want to just use a regular old usb keyboard and mouse to control shits you’ll be totally fine. Main reason i recommend this specfic set of peripherals is that they kind of split the difference between being cool and ergonomic and easyish to travel with.
You also don’t absolutely need to have the 25 keypad plus the trackpad plus the midi controller at all times. If you wanted to, you could just use the keypad and a trackpad, or keypad and a mouse/rollerball/whatever usb mouse like device you gots. Or you could ONLY use a mouse/keypad and nothing else. I think that would be kinda slow and unergonomic as fuck, but also quite cheap and compact so is up to you.
25 key QMK compatible Keypad
If you have no idea what QMK means, then just grab the one linked above. (If you are already familiar with QMK, then you probably already have too many clickity clackity keypads around already and can just configure whatever you gots) It doesn’t really matter to GW what kind of switches you select. I recommend using this keypad b/c for me, its the fastest and most ergonomic way to navigate the GW gui. As i mentioned earlier, you can always just use a regular old usb keyboard. I do not recommend attempting to use any kind of closed source numpad thingy as a replacement.
Trackpad
Perixx Peripad 501 (-ii)
Perixx Peripad 704
VssoPlor B0BDLJXBS9
You can just use a mouse or a rollerball thing too. trackpads are a little more handy for if you play out or use yr GW in
Korg Nanokontrol2 usb midi controller
There is def some flexibility here but you’ll have to do some research on how to remap midi ccs to fit the GW/VSERPI midi scene setting. Something to note is that at this moment, none of the toggle/momentary switches on the NK2 are assigned to any GUI stuffs. This might change with some future updates, but for now all you would really need out of a midi controller is 16 continuous controllers (e.g knobs or sliders). You can also totally get by without any midi controller whatsoever, but like i mentioned earlier, its the cooler way to control things.
4 Port USB 3.0 Hub
Depending on how many control peripherals you end up using, you might not need this. If yr planning on using keypad/keyboard + trackpad/mouse + midi controller then you will definitely need this tho! It would be good to pick up a power supply for this as well. You can probably use just about any old 4 port usb 3.0 hub with GW tho.
/***just randomly adding more links to the manual b/c ppl still don’t seem to be able to find it***/
VIDEO INPUT ADAPTERS
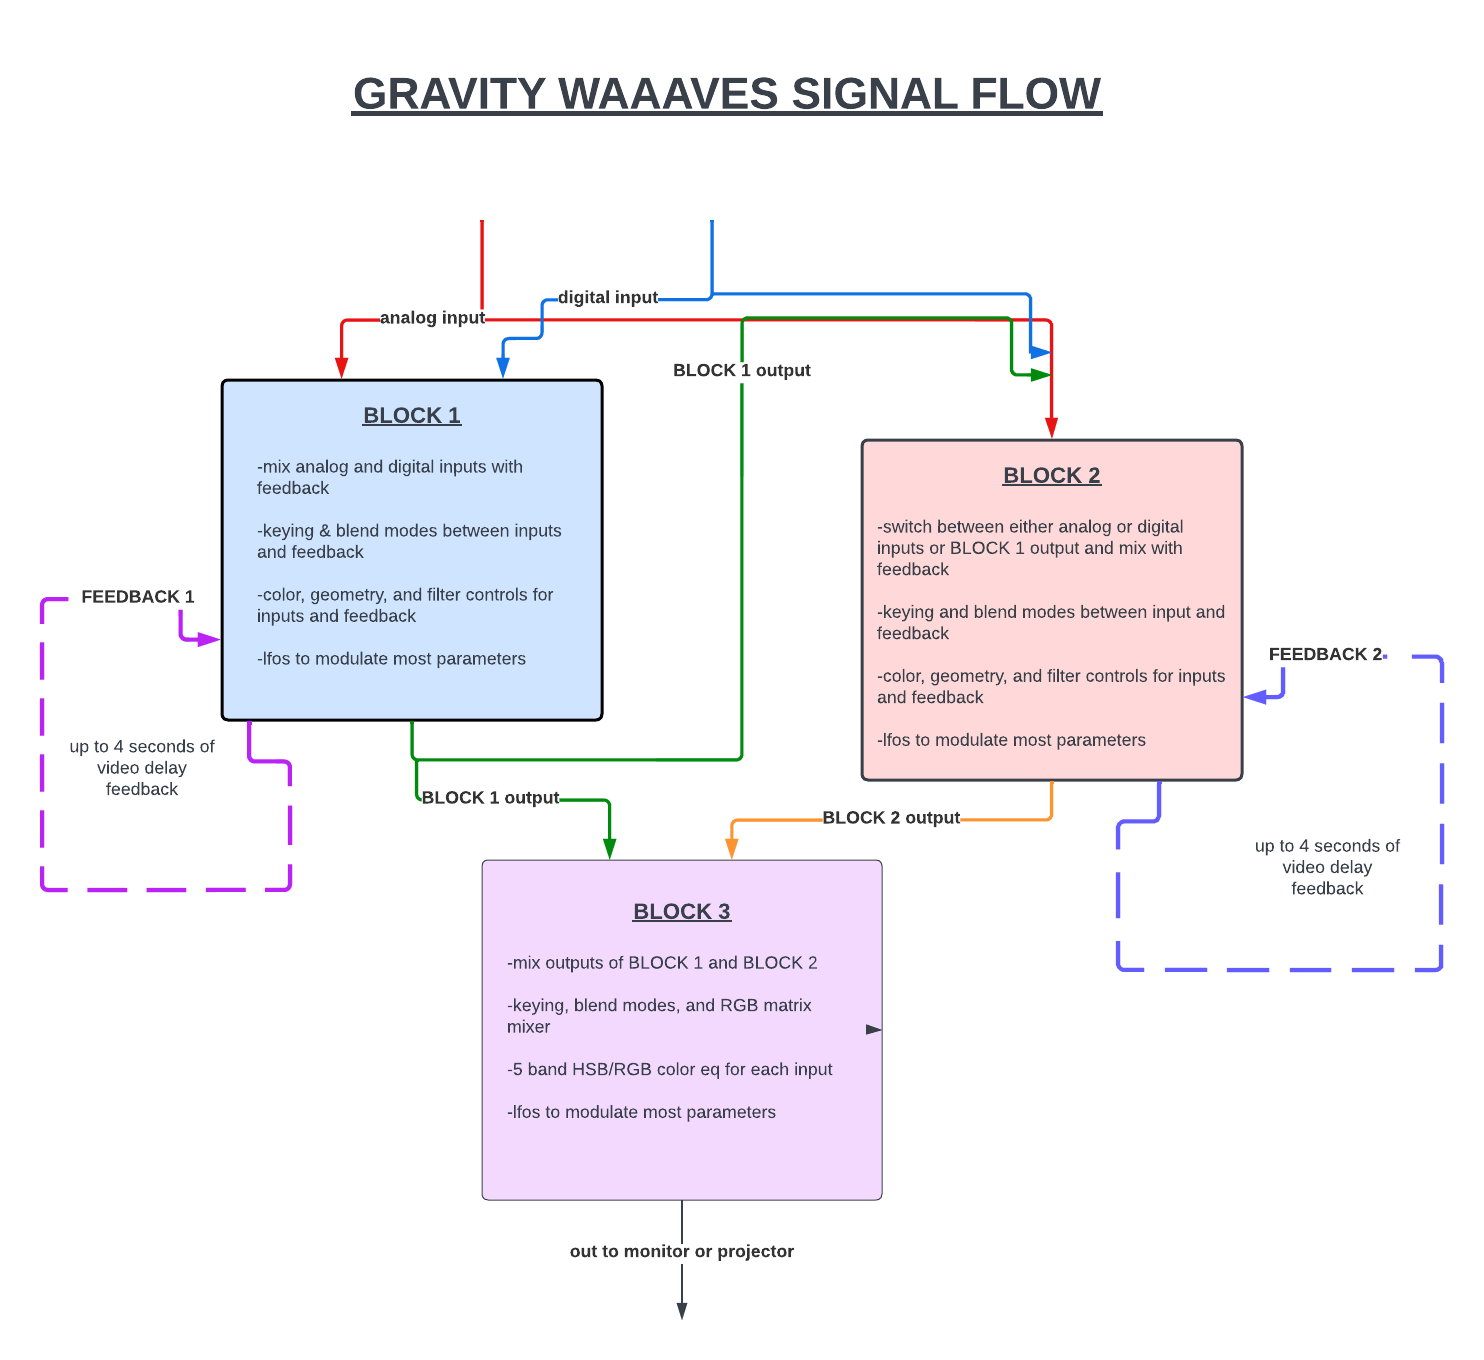
The default set up that i expect probably about half of GW users to work with is 1 analog input and 1 hdmi input. If you want to use 2 analog inputs or 2 hdmi inputs you can do that instead tho. Even if you are planning on working with only 1 input (or even no inputs) while running GW, i still recommend having 2 usb capture devices plugged in to GW.
UCEC Analog Video Capture
Only the this one linked above is verified compatible with GW 100 percent of the time. You are definitely welcome to experiment with other analog to usb adapters and please let everyone know if you find any other reliable working models, but i tested a bunch and this was the only one that worked every time. You will want to use the little usb extension cable that comes with this model as well. I recommend taking the DVD that comes with this, tie some string around it and hang it in your sunniest window to bring you good luck and fullfillment (alleged) from the ancient optical drive goddds.
HDMI to USB 2.0 Capture
Just the 2.0 version works fine here. You will want to source some kind of usb extension cable for this too, otherwise you wont be able to fit anything else in the other usb ports. Just like a 3 inch one is totally sufficent
Uf Da! that was a lot of gear to purchase, and kind of a lot of disclaimers about not substituting things. You are probably getting a better sense about what I was talking about with GW builds being a bit more involved than VSERPi by now, no?
check out this M A * N * U * A * L
W * R * I * T * I * N * G F * I * R * M * W * A * R * E * S
Ok now you’ve got everything all purchased and unboxed and sitting in a pile on a table somewheres. Next you are going to have to flash various kinds of datas to various devices so they know what the fuck is going on with their future life as a compact vortex generator.
FLASH THE SD CARD
You will want to have your sd card, an sd to usb dongle, and a computer handy. I would recommend using the command line operation dd to write images. Any linux or osx os will have dd available to use and you can install it on windows if you so desire. Because writing images can take a bit of a long time, i usually use a raspberry pi for this purpose. If you have a VSERPI you can use the .bashrc trick to turn off autorunning and just plug some usb drives in to read from and write to. It is also nice to use a raspberry pi for this purpose b/c it is possible to make a tiny mistake in dd and end up erasing a totally wrong drive, so can be a good thing to *not* learn how to use it on your primary laptop :)
Otherwise you can just use balena etcher on any os to write the image just like with a VSERPI.
Download the latest GW image here. It is usually recommend to do so over an ethernet connection, downloading archived image files over wifi can often result in a corrupted image. Extract the image using winrar or the unarchiver on windows or osx respectively; using other archival tools can also result in corrupted images sometimes. If yr on linux use whatever you like. Then use dd or etcher to write the image to your sd card. Note that if you are using windows, after you’ve finished writing the image you might end up with like about 22 explorer windows and associated prompt boxes popping up saying shit like “this drive/partition is in an unrecognized format do you want us to like do something about that?” The proper response to this is to open up task manager, right click on windows explorer and select ‘restart.’ Okidoki you have finished this step, just pop the sd card into the slot in the nano (note that this slot is spring loaded so try not to like jam it in too hard or use any kind of tools to pry it out, you can damage the springs, card, and card reader if you are not careful).
FLASH THE NANOKONTROL
If you have flashed an NK2 for VSERPI before, this is exactly the same process, using exactly the same files, and you can use the same nk2 you use for VSERPI interchangably with GW. Otherwise if this is your first time:
Download and install the Korg Kontrol Editor.
Download the VSE nk2 midi scene setting.
Read through the Kontrol Editor Manual (its very short) for details on how to write a midi scene setting to your nk2.
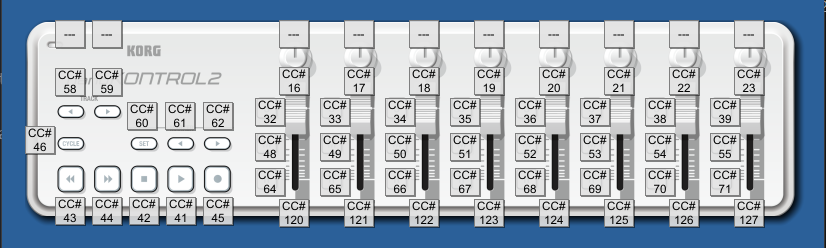
If you want to configure your own midi controller, what you want to do is assign cc 16-23 and 120-207 to 16 knobs or sliders. You might end up needing to assign some of the toggle/momentary switch ccs to something too in the future, is why i provided the image above.
FLASH THE KEYPAD
You will first need to download and install QMK toolbox. It could take a hot second to install all the related drivers and whatnot for it too, so give it a sec. Once thats all taken care of, download the .hex file for the GW keypad settings. Open up QMK toolbox, click the ‘open’ button and navigate to the .hex file you just downloaded. Plug the 5x5 keypad into a usb slot on your computer and with a paperclip or tiny screwdriver hit the tiny reset switch on the bottom. In the toolbox console you should see
“Atmel DFU device connected blah blah blah...”
in yellow text show up. Click the ‘flash’ button and you’ll see some text scolling stuff and then in yellow text
“Flash complete
Atmel DFU device disconnected blah blah blah...”
And you should be good to go.
If you’d like to go deeper into the QMK wormhole, you can use this folder to edit or create your own GW keymap
P * L * U * G * I * N * & * P * O * W * E * R U * P
First plug in video output stuffs. Remember that you need to have two monitors, 1 for gui stuffs, and 1 for video output. I usually use the displayport video out for the GUI monitor, i’m not really sure that it makes any difference tho. Plug in all of the usb stuffs for interfacing and controls. Leave the video usb adapters unplugged for now. Plug the power in, and if you set up the case with the power buttons, press on. It can take a bit of time (maybe like 3-5 minutes) to boot up the first time. In general you can expect it to take about a minute or so to boot up.
You’ll eventually end up at a desktoppy looking screen. Click on ‘display configuration’ and select ‘execute in terminal.’ Follow the instructions to configure displays how you’d like to use them. You will only really have to do this step when you are using a new arrangment of displays.
Once the displays look good, plug the video usb stuffs in and click on the ‘run gravity waaaves’ and you are good to go!
C *O * N * T * R * O * L * & * N * A * V * I *G * A * T * I * O * N
controls are easier to figure out if you have the manual!
TRACKPAD STUFFS
tap to click. buttons don’t always work. just tap the pad itself or use the keypad buttons with the trackpad.
5x5 KEYPAD STUFFS
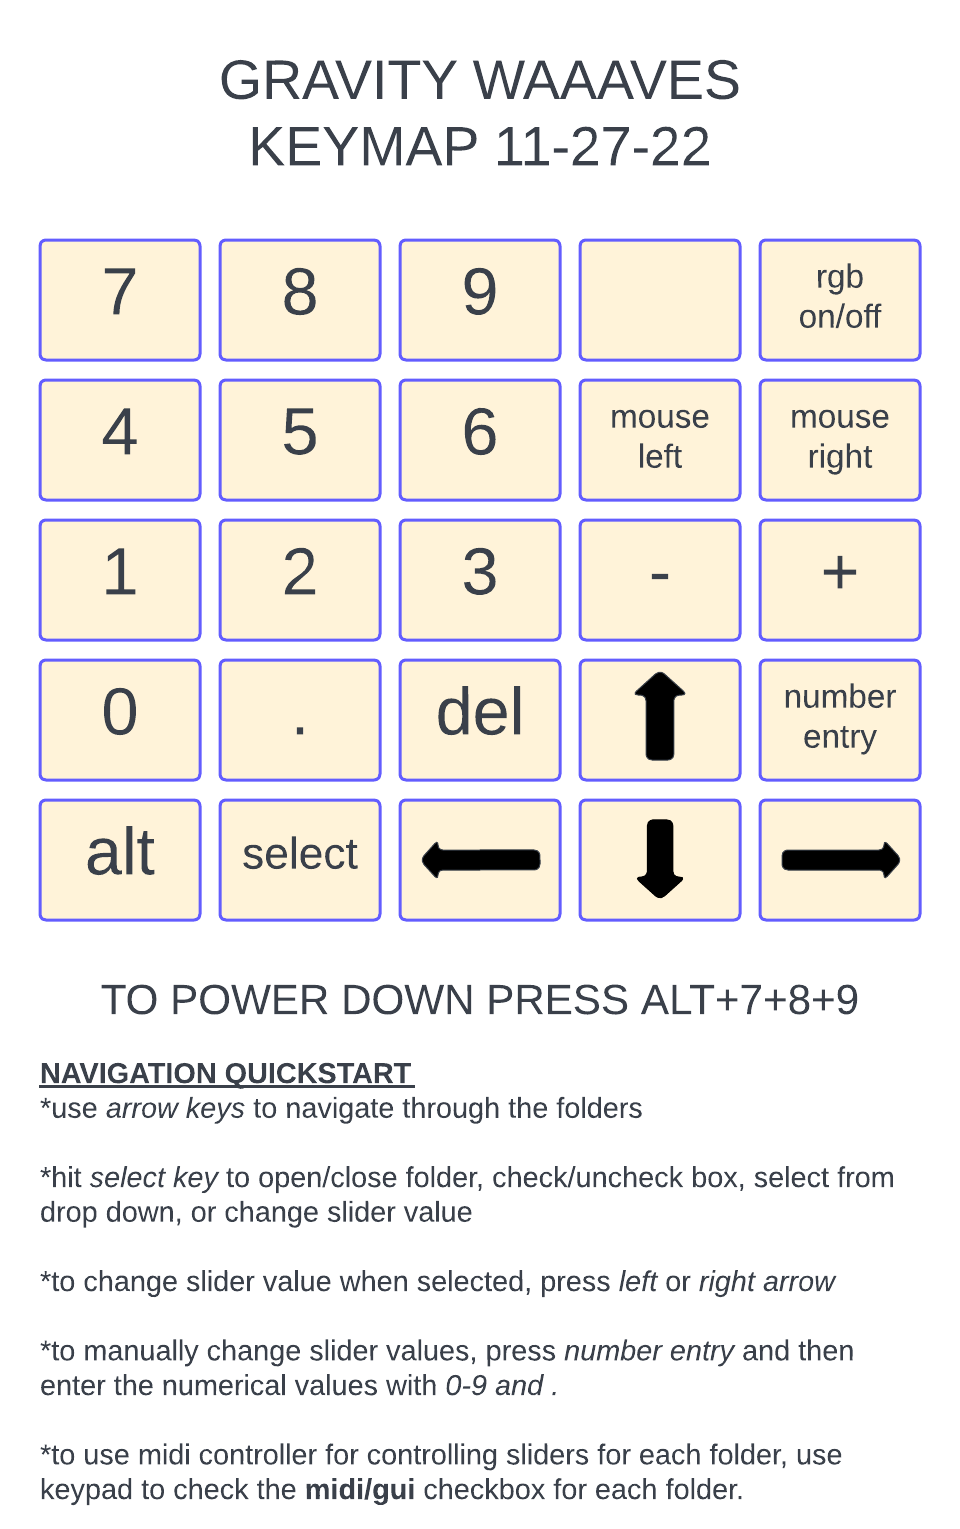
Its probably just a good idea to download the above image and print it out. Labeling the keys with something is also recommended. rgb on/off means turning on/off the color led shits on the keypad itself. There is left and right mouse click buttons assigned to the keypad b/c we were having issues with various trackpads not working so hot, so on the off chance that you ended up with one of the trackpads that lets you move the mouse cursor around but clicking doesn’t work you’ve got some redundancy. Everything else should either be explained on the image or be pretty self explanatory from the gui itself.
IF YOU JUST ARE USING A REGULAR OLD USB KEYBOARD
Just about everything (numbers, . , delete, alt, arrows) translates to the same keys. SELECT is space bar and NUMBER ENTRY is enter.
If you want to mess around with any of the settings within the larger OS, the current password is ‘password’. you should probably change it if you are connecting to any networks at any point, otherwise unless you are like actively mixing footage of like your bank account with yr social security number while ethernet connected into a network at like starbucks or something it shouldn’t be an issue.
That should be about everything you need to get started! If you run into any issues with any of the steps listed above, please post something on the VSE discord and/or scanlines.xyz. Please do not reach out to me personally in any way shape or form for help with any of this, theres just too many folks interested in doing this for me to be able to offer any kind of 1 on 1 support. These are DIY instructions, not DIFM. Also, now that you can see even just a tiny bit of the kind of work that goes into making sure projects like this are decently documented, open source, and available for anyone with the available cash flow and time to put together themselves, head on over to my patreon and think about at least doing a 1 time donation, if not a regular subscription. Every little bit makes a difference, not just in my life, but in the lives of everyone who gets the opportunity to build their own GW, VSERPI, or install VSEDSK for themselves! Supporting me financially helps make these tools available and easier to use for everyone else around the world who otherwise would have extreme difficulty getting access to stuffs like this.
heres another link to the manual
and another link to images

If you appreciate the public domain open source software and educational materials I provide and can afford to spare some cash it is highly appreciated! The more donations I recieve the more time I have to spend on developing these resources! Please also consider subscribing to my patreon page as small amounts of regular income are appreciated as well!