Waaave Pool is an open source video delay/video feedback playground cobbled together out of raspberry pis, midi controllers, and various camera/video sources.

(notes: parenthesis (U) and (B) after the controls means Unipolar and Bipolar respectively. unipolar means that values go from 0-1, bipolar means that values go from -1 to 1. this means that if you want to set values to 0 on a unipolar knob then you turn it all of the way to the left and if you want to set values to 0 on a bipolar knob you set it at 12 o clock. Unipolar 0 on a slider means all of the way down, bipolar 0 means exactly in the middle. Most of these parameters we will assume are normalized, which means we will think of 0 as being all of the way off and 1 as being 100 percent on. This can get a little strange because some values are set so that they actually go from like -200 percent off to +200 percent on but bear with me, it is all happening for reasons! if the default parameter set is anything other than (0,1) or (-1,1) it will be shown in parenthesis as well. the framebuffer delay channel will be henceforth referred to as fb0)
/***1.5 Updates Info****/
*video reactive controls are now happening. press the n to switch them on and off. Video reactive means that the video input can be used as a modulation source. to test this out make sure to lumakey out at least 75 percent of the input video so that theres lots of feedback happening, then slide x-displace up a little bit. press the video reactive button and then go back over to the x-displace slider and move it in the opposite direction (remember to go through 0 the first time b/c midi latching applies to video reactive controls too!). you should notice that the x displacement will be different depending on how bright the input video is at that point. try turning off the video reactive controls and lumakey out 100 percent of the input video so you can see it a bit more strongly!
*mirror mode has been added in addition to toroidal universe. press h to switch on/off mirror mode. if mirror and toroid are both switched on, mirror will trump toroid.
*control number 8 (the knob all the way to the right, midi CC 23) Is now Sharpening instead of input contrast. turn on lots of feedback and twist that knob up to see some crazy patterns happening!
1. Luma Key Level. (U)
This selects a brightness value in the video input channel to key fb0 into. For example, if I turn my Luma Key Level knob to 12 o clock, that means everything in the input channel with brightness less than 50 percent will be replaced by fb0. 0 means that none of fb0 is keyed in, 1 means that none of the input channel will be visible. When the luma key switch is flipped it just reverses the operation here so that if knob is at 12 o clock everything with brightness more than 50 percent will be keyed out.
2. Mix level. (B) (-1.1,1.1)
For values between 0 and 1 this functions as a fade between the input channel and fb0. For values outside of this range interesting distortions can happen. Strobing can occur when there are very short (less than 5 frames) delay times and negative mix values. Mix is downstream from Key so you can key and mix at the same time, the mixing will only affect the unkeyed part of the input channel though! The actual mathematics being performed is a linear interpolation (aka lerp in many programming languages) between each pixel. Let Input pixel be I, Mix level be M and fb0 pixel be F, then the value of each pixel will be set by I*(1-M)+F*M.3. Fb0 Hue Attenuation (B) (.25,1.75)
This is a multiplier for fb0 hue. Because of the feedback loop involved, multiplicative operations have exponential effects so it is sometimes best to play around with very small changes with a very small delay time to get a feel for what kind of patterns and behaviors can emerge. Attenuating hue will often want to cycle through all the values in the spectrum so if you do not want your screen to be just rainbow zones 24 hours a day try playing around with the hue chaos controls as well.
4. Fb0 Saturation Attenuation (B) (.5,1.5)
This is a multiplier for fb0 saturation. Turn all the way off for greyscale feedback, crank it up for supersaturated feedback, play around with small shifts for soft pastel trails
5. Fb0 Brightness Attenuation (B) (.5,1.5)
This is a multiplier for fb0 brightness. Values around .8 or .9 will result in trails that fade away softly, values above 1 will clamp out and fill the screen.
6. Temporal filter mix (B) (-1.1,1.1)
For values between 0 and .99 the temporal filter can help smooth out some of the potential harshness, business, and/or strobing that can very often occur when using this system. For values over 1 the temporal filter goes into a fairly pure digital feedback mode and can slow things down considerably while still oozing along like a wet digital oil painting. For values less than 0 many interesting patterns can occur as well as some amount of strobing. The temporal filter is a linear interpolation with theh previous frame performed downstream from the keying and fb0 mixing.
7. Temporal filter strength (U)
This attenuates the brightness and saturation of the temporal filter to enhance complex pattern formation if desired.
8. Sharpen(U) (0,1)
Applies a sharpening filter to the feedback, resulting in lots of crazy worms.***interlude to explain a couple things***
if you are using the nanokontrol2 controller then you will notice for the sliders 9 through 16 there are 3 buttons next to each slider. for sliders 9 through 15 what these buttons do is control the total range for each corresponding slider. so for example no button pressed is a pretty small range, S toggled on means a Slightly larger range, M toggled is a Medium larger range, R toggled is a completely Ridiculous range. Larger range buttons bypass smaller range buttons so if M is toggled on and then R is toggled on then only R is active. Since each of these sliders will have 4 total ranges available each will be listed in order from default small to largest. The toroidal universe toggle will have drastic effects on xyz and rotational displacements as well, a toroidal universe means that that left/right and up/down edges of the screen wrap around much like in the video game Pac Man. Enabling toroidal universe means that feedback can wrap around the screen, when used in conjunction with extreme displacements this can result in extreme fractal patterns.
9. X displace (B) (-6.4,6.4), (-12.8,12.8), (-32,32), (-64,64)
This displaces the x position of fb0 measured in pixels. For a sense of scale internal processing is done at a resolution of 640x480 so a displacement of 64 pixels means 1/10 of the screen. Fractional displacement values correspond to averaging between pixels, so a displacement of .5 means an average between two pixels is being calculated implicitly. Loosely speaking displacement amount for a certain scale corresponds to the speed of feedback trails and coarseness or fineness of patterns emerging. Small displacement values result in smooth oozing trails and complex reaction diffusion structures. Large displacement values result in distinct copies of the source material repeating themselves. Ridiculous displacement values can be used for manipulating large scale abstract shapes in a strange feedback synthesis version loosely reflective of more traditional analog style video synthesis.
10. Y displace (B) (-4.8,4.8), (-9.6,9.6), (-24,24), (-48,48)
This works exactly the same as X displace but in the Y axis. I'm not going to just cut and paste everything from the x displace description and crtl-f replace all x with y. Do you ever read manuals where they do that for like 5 or 6 parameters? What on earth are they thinking? Why are manuals so often written as though they are instructing a robot in a task. Like its pretty likely that a human or human like intelligence is reading these words, is it actually that difficult to try to communicate with them using anything other than "the Z PLANE FILTER SYSTEMtm is alternuverted by our top secret secret proprietary QUATERNION ROTATIONALITYtm thus multimodal IIR filters ensue when the k plane of local resonance is hyperbolically mapped into the POINT AT INFINITYtm" being copy and pasted 18 times throughout the text.
11. Z displace (B) (.95,1.05), (.9,1.1), (.75,1.25), (.5,1.5)
The ranges for z displacement are calculated in terms of blowing up or shrinking as a percentage, so 1.5 means the image is increased in size by 150 percent and .5 means that the image is shrunk by 50 percent. The exact operation being performed is a simultaneous multiplication in x and y positions. Perhaps a more useful way to get a feel for how z displacement works is to turn on brightness invert, turn off toroidal universe, and just zoom in and out at each range. When you are comfortable with that range of things then zoom out as far as possible and then turn on toroidal universe. Ok start wiggling around x and y tiny bits now. Then try some rotations next. Make sure to get up and stretch your legs and arms and back out at least once every 45 minutes! Physical comfort is an important priority. I don't necessarily recommend smoking cigarettes but you could always try just pretending to just to have an excuse to step outside and stop staring at a screen at least 1nce per hour!
12. Rotate (B) (-PI/10), (-PI/5), (-2*PI/5,2*PI/5), (-8*PI/5,8*PI/5).
Note on terminology: these rotations are measured in radians not degrees, because degrees kind of only makes sense as a default measurement if one is a babylonian surveyor working in a sexagesimal number system. As this is not one of the more common job descriptions in modern life lets all agree to let degrees drift away. Honestly Tau seems like a better choice than PI as well but incremental updates are best to maintain backwards compatibility. Radians measure rotations as how far one has traveled around the perimeter of a circle with radius 1. 2xPI -> 1 full rotation, PI/2 is a 90 degrees, PI is 180 degrees, etc etc. Default rotation ranges are all set to generate variations on 5 fold symmetrical shapes at max as opposed to 4 fold symmetries. This is on purpose, try out 4 fold feedback symmetries and see if you can figure out why I would steer away from that as a default state.
13. Chaotic Hue mod (U)
Chaotic Hue Mod sets a limit on the range that hue can cycle through. Very high (low) values for this will result in monochrome or very minimal color spaces. Wildly different behaviors can happen depending on the settings of HSB attenuation and Chaotic Hue LFO and Chaotic Hue Offset
14. Chaotic Hue LFO (U)
This is not exactly an LFO in the traditional sense of audio signal processing but it tends to feel like one in operation. This can be used to change the rate, texture, and patterns of hue cycling. For very small values smooth shifts occur. For larger values intense hue strobing can happen. Some certain settings can cause both saturation to drop out as well as brightness as well. If you are curious as to why messing around with hue values can affect saturation and brightness it is because HSB is not the native color space, RBG is. When RGB gets mapped into HSB and then we do very chaotic things to hue before mapping back into RGB, the effects can be unpredictable and can actually make the maps from HSB to RGB and back 'glitch out' a bit.
15. Chaotic Hue Offset (U)
This adds an offset to the hue. When Chaotic Hue mod is set to very high values resulting in a very restricted palette one can use the offset to choose the color. When Chaotic Hue LFO is running and you would like to mix up the cycling you can use this as well. Really the only way to get a handle on these 3 parameters is to use them heavily and changing them only in the default small ranges at first. Each parameter will have different effects depending on where the other two parameters are at. One very fun technique to use with these 3 parameters is to turn off keying, turn out mix to about .5, turn temporal filter to about .25 and temporal filter strength to about .5 and then experiment with different combinations of the Chaotic Hue parameters to use them as a kind of chaotic colorizer on your input!
16. Delay time (U) (1-60)
Delay time is measured in Frames. Waaave_pool operates at 30 frames per second so there is a total of 2 seconds of delay to draw from. Delays will behave quite differently depending on if the framebuffer is fed from the input or from the final output.A. Fb0 Brightness Invert
Switches on and off Brightness Inversion on fb0. This multiplies the attenuated value from knob 5 by -1.B. Fb0 Saturation Invert
Switches on and off Saturation Inversion on fb0 same as A does to brightness!C. Fb0 Hue Invert
Switches on and off hue Inversion on fb0D. Fb0 Horizontal Mirror
These switches are mostly self explanatory arent they?E. Fb0 Vertical Mirror
Like you get the point by now. its a toggle how complicated can it be?F. Toroidal Universe
Ok this is worth getting into a little bit. When you switch the feedback wraps around the screen in various ways. If something goes off the left side of the screen it will pop back over on the right side and verce visa. Same thing for top and bottom edges. When you zoom out super far the toroidal universe will fractalize everything. When you rotate in toroidal various kinds of mirrorings and wrapping swill happen at the edges. Lots of Fun!G. Luma key switch
This switch toggles back and forth between luma keying into the whites and luma keying into the blacks.H. Mirror Mode
this switch toggles on off mirror wrapping around the edges when you rotate, zoom, or displace the framebuffer. mirror mode trumps toroidal universe if both are active.I. HD/SD aspect ratio switch
For use with the Capture Bundle supported HDMI usb input, this will switch the aspect ratio of the captured video to support 16:9J. Framebuffer Reset
Clear everything in the framebuffer. This will cause your frame rate to slow down until you move another midi control so if yr doing this live make sure to wiggle another knob real quick so that you don’t get some stutter strobing going onK. Parameter reset/Motion recording clear/video reactive parameter reset
Resets all parameters to defaults and clears all motion recording.L. Feedback/Feedforward delay shift
The default for delay is feedback, meaning that the delay buffer is fed from the final output and that you get crazy video feedback happening all over the place. However if you hit this switch the delay buffer instead gets fed directly from the input which means that you can use WP as a powerful video processor. Simply key out the input and then you will be able to use all of the knobs to process the input directly. Zoom, rotate, displace, attenuvert HSB, do some crazy colorizing, delay the feed by 2 seconds, turn on mirror mosaic mode with the toroid switch, add more h and v mirrors to stuff! Aaaand you can still do feedback on this mode by using the temporal filter! A real dang ol game changer in the Waaave Pool Multiverse!M. Motion recording
Turn on and off motion recording! When motion recording is enabled there will be an 8 second buffer that will record and loop all continuous input! Use this to sequence and automate every parameter to your hearts content!N. Video Reactive Mode
Turn on and off video reactive mode! When activated, all of the sliders and knobs will, instead of directly affecting their respective parameters, control how much the Brightness of the input video affects said parameters.Theoretical Question: “Ok so I got one of the Editions without the midi controller and want to use my own instead, How do I do that?”
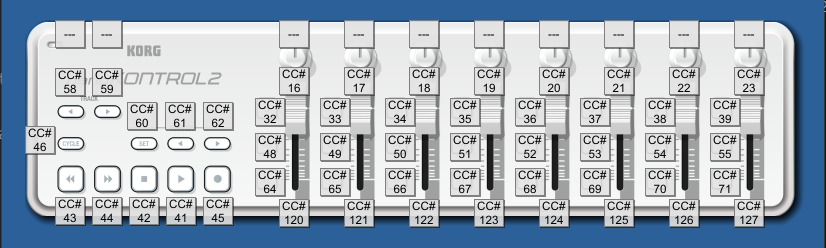
Well I am glad u ask thank u for yr continued interest! Here is a list of the default midi cc’s for values, it is easiest for you to create a seperate scene for your midi controller remapping the internal cc’s to these! Another option exists for editing the cc values within the c++ part of the Waaave Pool code but thats probably only a good idea if you know how a bit of programming and can figure that part out on yr own! A third option is head over to the Video_Waaaves FB group and ask if anyone has posted up a scene for yr brand of midi controller already!
list of default midi ccs
Luma key -16
Mix -17
Hue_x -18
Sat_x -19
Bright_x -20
Temporal filter mix -21
Temp filter Q -22
Input boost -23
X displace -120
Y displace -121
Z displace -122
Rotate -123
Chaotic hue mod -124
Chaotic hue lfo -125
Chaotic hue offset -126
Delay time -127
***toggle switches***
bright invert -43
saturation invert -44
hue invert -42
H mirror -41
V mirror -45
Toroidal Universe -46
luma key swap b/w -60
framebuffer reset-58
parameter reset/motion recording clear-59
feedback/feedforward mode switch-71
motion recording on/off-39
on the nanokontrol for each of the sliders (midi cc values 0 through 6) there are three buttons alongside which I have programmed to change the total range of what each slider does. I will list those cc values here in the order (medium, large, ridiculous) (small is default setting. the larger buttons override smaller buttons so if medium, large, and ridiculous are all toggled then only ridiculous is actually enabled. ridiculous settings for the xyz and rotate plus toroidal universe is where very ornate fractal painting mode gets started
x displace (32,48,64)
y displace (33,49,65)
z displace (34,50,66)
rotate (35,51,67)
chaotic hue mod (36,52,68)
chaotic hue lfo (37,53,69)
chaotic hue offset (38,54,70)
Theoretical Question “Ok Heck and Alas, I did not get anything with a midi controller and I just have a usb keyboard to interact with, whatever am I to do?”
Word up My dogg I got u covered. Here is a list of keyboard parameters controls! some notes on keyboard input: I set the default increments to be kind of small, you need to hold down a key to see the effect really happening. Some folks find this confusing and frustrating at first and think that their controls are broken! They most likely aren’t. I super recommend at least trying out this mode of controls at first and seeing if you can get used to it, if enough people let me know that they want way larger increments per keystroke in the Video_Waaaves fb group then I will change things tho!
keyboard controls for each pair x/y means that the corresponding alphanumerical keys on a keyboard increment and decrement the values
a/z - fb0 z displace
s/x - fb0 x displacement
d/c - fb0 y displacement
f/v - fb0 hue attenuation
g/b - fb0 saturation attenuation
h/n - fb0 brightness attentuation
j/m - fb0 mix
k/, - fb0 lumakey
[/] - delay time
q/w - fb0 rotate
o/p - temporal filter
;/' - temporal filter resonance
l/. - input boost
e/r - chaotic hue mod
t/y - chaotic hue lfo
u/i - chaotic hue offset
-/= - y skew
9/0 - x skew
1 - clears the framebuffers
! - resets all controls
2 - invert framebuffer0 brightness
3 - invert framebuffer0 hue
4 - invert framebuffer0 saturation
5 - vertical mirror
6 - horizontal mirror
7 - toriodal universe
if you are using a midi controller then these keyboard controls will work as well but yall should take into account that using both the midi controller and the usb keyboard at the same time can do some really confusing stuff in terms how keyboard entry can offset ranges of the midi interfaces! so maybe fun if you like to be confused but just a heads up on that front.
TROUBLESHOOTING
FIRST THINGS FIRST: make sure every component is plugged in (usb camera and usb midi controller/keyboard and the video cable) before you plug in the power supply! This device does not support hotswapping in usb so if you want to try different sources its best to power down and then swap them out. If you have multiple midi controllers or multiple usb camera sources plugged in only one can be used with the default set up. The capture edition does allow hotswapping of the analog video sources but it is still best to have any analog video source plugged in before powering up.
”I have no output when using the analog video”
There are two main reasons why this might happen. 1. You don’t have the right kind of breakout cable or 2. There is something goofy happening with the configuration settings. There is a simple way to diagnose which issue you are having. Power up the unit with the composite breakout cable plugged in and wait about 30 seconds, then try plugging in an hdmi cable and see if you get output that way. If you are getting hdmi output without an hdmi cable plugged in before powering on then it is an issue with config.txt, if not then it is an issue with the breakout cable! read on for solutions to both of these issues.
BREAKOUT CABLES: This unit requires a TRRS (tip ring ring sleeve) 1/8th inch to 3 rca cable like one of these (CTIA is one name for this standard, many cables designed for zunes and a generation or so of ipods follow this standard but not much other than raspberry pis do nowadays that I am aware of!) . Here is some information on rigging things up in a more DIY manner. Note that many people have been able to use OMTP standard cables by going out thru the red rca cable. Using video signals through audio cables works like 95 percent of the time but every so often you can come across a situation where it wont so heads up on that front.
CONFIGURATION SETTINGS; there is a text file config.txt which can be accessed by pulling out the sd card from the back and plugging it into a computer via some kind of usb adapter! You will know that this needs to be acessed and double check the HDMI hotplug settings if you have the unit powered on and have no analog video out and are able to plug in an hdmi cable and get video out while it is still running.
“I can’t get the keyboard controls to work”
I have been told that if the usb keyboard method is not working that you can try unplugging and plugging back in the keyboard while the pool is running and that usually works. Also don’t forget that yalls needs to press and hold the key down to see anything going on and that you will First Have To Make Sure that you have the feedback lumakeyed in!
join the video_waaaves fb group to keep up to date on this and other softwares and hardwares that i make!
https://www.facebook.com/groups/440566853501750

If you appreciate the public domain open source software and educational materials I provide and can afford to spare some cash it is highly appreciated! The more donations I recieve the more time I have to spend on developing these resources! Please also consider subscribing to my patreon page as small amounts of regular income are appreciated as well! Or you could also support my ko-fi if you like getting stickers and stuff on a regular basis.