ARTIFICIAL LIFE MANUAL
Definitions:
Rate: the speed of change between successive frames of a video oscillator
Frequency: the number of cycles per frame of a video oscillator
Amplitude: the brightness of a video oscillator
RM-ring modulation. The amplitude (brightness) of the modulating oscillator modulates the amplitude of the carrier oscillator. Will function both as ring and amplitude modulation depending on the amplitude of the carrier wave
PM-phase modulation. The amplitude of the modulating oscillator modulates the phase (frequency) of the carrier oscillator.
PARAMETERS, CONTROLS, and MIDI CCS
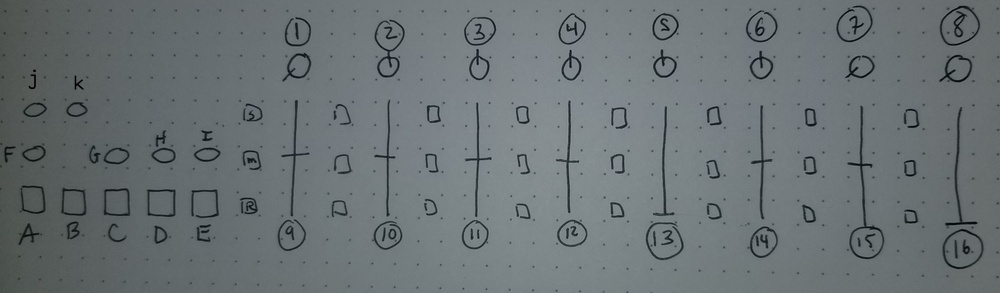
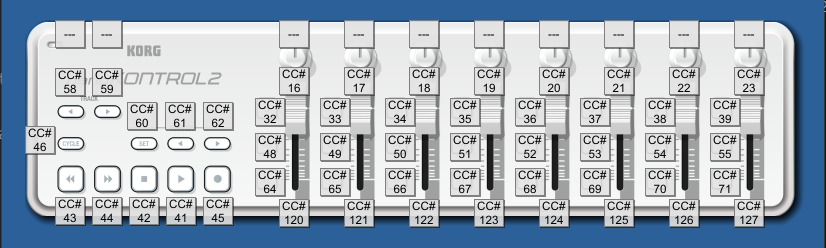
As you can see there are a number of toggle switches adjacent to each slider. Pressing the S button next to each slider allows you to switch back and forth from the primary to secondary oscillator controls for each set of controls. I’ll be referring to each S button with the number of the slider immediately to the RIGHT of the toggle switch so S9 refers to the little S button directly to the left.
The controls 1,2,3,9,10,11 are all switchable between Osc0 and Osc0_m. Press s9 to switch between controlling Osc0 and Osc0_m. Note that unless you have something dialed in to modulate Osc0 with Osc0_m (PM, RM, radial modulation) you won’t notice anything! Same goes for controls 4,5,6,12,13,14 and s12 to switch between Osc1 and Osc1_m. For example from booting up try hitting s9 right off the bat and then adjust Osc0_m PM (11) or Osc0_m RM (3) to see some of the different ways Osc0_m can affect Osc0!
/***1.5 Updates Info****/
1.Boot up AL with the following controller setup: Osc0 Amp (9) all the way down, osc0Frequency (2) all the way to the right, osc0 rate (1) all the way to the left, osc0 pm(11) all the way to the top.
2. once AL has booted slowly move osc0 amp slider up. you'll notice that nothing should affect the overall amplitude until you reach all the way to the top and then start sliding back down. This is because Osc Amps are all set to 1 as a default and this is a Unipolar control
3. next try moving Osc0 frequency to the left. you'll notice that nothing will affect the screen until you reach like 1 notch before all the way to the left. this is because osc0 frequency is set to like .1 as a default and it is unipolar control.
4. next press S9 ( the S button on the nanokontrol immediately to the LEFT of slider 9, midi cc 32) to swap the control set over to Osc0_m. Lets test out midi latching on the secondary oscillator set.
5. To make Osc0_m visible we will first need to have it modulate Osc0 in some way. start moving 11 down and you should notice that nothing happens until you reach the bottom and then start moving up again. this is because the default value for PM is 0 and it is Unipolar control.
6. Now that we can see (indirectly) whats going on with Osc0_m lets try adjust ing the rate. slowly move 1 from the left to the right. you should notice that nothing happens until you reach the exact middle and then once you move from the middle to the right the rate will increase. this is because default rate is 0 and this is a Bipolar control
7. test some more things out with Osc0_m, like amp, frequency, axis etc. try to make sure that each knob and slider 1,2,3 and 9, 10, 11 are in different positions than where they were before you switched to Osc0_m
8. Now press S9 again to switch controls back to Osc0. start adjusting things and note how sliders and knobs don't activate until they reach whatever setting they were last at!
*Oscillator width control and PWM has been implemented. strictly speaking this is more accurately described as Pedestal or "DC offset" but as the visible change is that the width of the oscillator is shifted i'm going with that as a description. to test out the new controls boot up AL and then first press S11. move 11 up and down and you'll see the width of the oscillator changes (as well as the overall brightness gradient). press M9 and R9 to see how they work with the different wave shapes. next press M11 to switch to Osc1->Osc0 PWM. move 11 up and down the whole range to note where latching occurs and to see how Osc1 modulated PWM works. All the oscillators now have width and PWM controls. S14 shifts 14 to OSC1 width and M14 shifts to OSC0->OSC1 PWM. when controls are in OSC0_m/OSC1_m mode (S9/S12 is active) pressing M11/M14 shifts controls to how much OSC0_m/OSC1_m modulates the width of OSC0/OSC1. Width controls can help out a lot when AL is used a seed for video feedback via cameras, mixers, or Waaave Pool as you can control the amount of positive/negative space a lot better than otherwise.
*the color controls have shifted from RGB offsetting to a 3 band colorizer. The controls are all now unipolar and set to 0 as defaults. To test out boot up and then press R15. This changes 7 to control OSC0 saturation depth and 15 to control OSC1 saturation depth. twist 7 all the way to the left to midi latch and then all the way to the right and you'll see everything turn from white to red. Then press M15 and twist 7 from all the way left to the right and you'll see that the part of OSC0 that was the brightest will hue shift from red to green to blue back to red. Press S15 and twist 7 from left to right to see the same hue shift happen in the middle brightness range. Press S, M, and R 15 so that they are all unlit and then move 7 from left to right and the darkest part of OSC0 will hue shift in the same way. Each colorizer band has a soft key so that the different colors selected in each band will smoothly gradient from one to another. This will be the most noticable when each succesive band has complementary hues chosen. To test out the same thing on OSC1 press F to shift the view to OSC1 and try the same succession of buttons & twiddling but with slider 15 instead of knob 7
*internal feedback modes have been tweaked a bit as well, to test out boot up AL and then press A to shift from input PM to internal feedback PM mode, then press M16 and twist 8 from left to right slowly. You'll see that the internal feedback goes from minimal at low values to chaotic and noisy at mid values to smooth and goopy at high values. Try adjusting the colorizer settings on OSC0 and tweaking the feedback intensity to see some interesting side effects between the new modes
1. Osc0 rate/[s9 Osc0_m rate]
2. Osc0 frequency/[s9 Osc0_m frequency]
3. Osc0 RM/Osc0_m RM
Osc0 RM controls the amount of RM from Osc1 into Osc0. Osc0_m RM controls the amount of RM from Osc0_m into Osc0.
4. Osc1 rate/Osc1_m rate
5. Osc1 frequency/Osc1_m frequency
6. Osc1 RM/Osc1_m RM
Osc1 RM controls the amount of RM from Osc0 into Osc1. Osc1_m RM controls the amount of RM from Osc1_m into Osc1. r11 changes the ranges and filters of RM.
7. Osc0 colorizer level1/Osc0 colorizer level2/Osc0 colorizer level3/Osc0 saturation
Add color and contrast to the output of Osc0. press s7/m7/r7 to switch between each mode. note that if saturation isn’t turned up you won’t see anything happening with color levels!
8. Osc0 rate modulation/Osc0_m rate modulation/Osc0 camera or internal feedback PM/Osc0_m camera or internal feedback PM
Osc0 rate modulation controls how much the rate of Osc1 affects the rate of Osc0. Osc0_m rate modulation controls how much the rate of Osc1_m affects the rate of Osc0_m. To switch between camera and internal feedback PM for this functionality press A. Press s16/m16/r16 to switch between each mode.
9.Osc0 Amplitude/Osc0_m amplitude
10. Osc0 axis orientation/Osc0 radial/Osc0 rotation/Osc0 modulation rotation and
Osc0_m Axis orientation/Osc0_m radial/Osc0_m rotation/Osc0_m modulation rotation
wow this one does a lot of various radial, axial and rotational things. As before to switch between Osc0 and Osc0_m hit the s9 button. With none of s10, m10, r10 pressed this changes the axis of oscillation.
s10-Osc0 radial changes from concentric lines to concentric circles. except they are not exactly circles lol but like blobby ovals. I’m like symmetry but not like TOO much symmetry
m10-Osc0 rotation controls the rate of free running rotations. its another secret oscillator (but not a video oscillator). geez what an absurdly complex unit!
r10-Osc0 modulation rotation controls how much Osc0_m modulates the axis of orientation of Osc0! its a real mouthful but just try it and it’ll probably make more sense.
you can figure out the Osc0_m version of this by now i think!
11. Osc0 PM/Osc0 PMx10/Osc0 PWM/Osc0 PW and Osc0_m PM/Osc0_m PMx10/Osc0_m PWM/Osc0_m PW
Osc0 PM controls the amount of PM from Osc1 into Osc0.
R11-amplifies PM by 10
M11-controls the amount of PWM from OSc1 into Osc0
S11-controls the ‘width’ of Osc0
With s9 pressed the controls switch to Osc0_m
Osc0_m PM controls the amount of PM from Osc0_m into Osc0.
R11-amplifies PM by 10
M11-controls the amount of PWM from Osc0_m into Osc0
S11-controls the ‘width’ of Osc0_m
12.Osc1 Amplitude/Osc1_m amplitude

13. Osc1 axis orientation/Osc1 radial/Osc1 rotation/Osc1 modulation rotation and
Osc1_m Axis orientation/Osc1_m radial/Osc1_m rotation/Osc1_m modulation rotation yall got this right? aint needin to cut and paste all over the place i am a busy human.
14. Osc1 PM/Osc1 PMx10/Osc1 PWM/Osc1 PW and Osc1_m PM/Osc1_m PMx10/Osc1_m PWM/Osc1_m PW
but just to reiterate: Osc1_PM is FROM Osc0 INTO Osc1. Osc1_m PM is FROM Osc1_m into Osc1. check the controls for 11 and substitute 1 for 0 and s12 for s9
15. Osc1 colorizer level1/ Osc1 colorizer level2 / Osc1 colorizer level3/Osc1 saturation
yup yup.You’ll note that messing around with these values does all kinds of super fun and interesting things when theres any kind of feedback between osc0 and osc1. and like there should always be at least a tiny bit of feedback between them, thats kind of the point of this!
16. Osc1 rate modulation/Osc1_m rate modulation/Osc1 camera or internal feedback PM/Osc1_m camera or internal feedback PM
same shit different oscillator. Press s16/m16/r16 to switch between each mode.
A. Switch from camera/capture source to internal feedback source for Osc0 cam/internal feedback PM
B. Switch from camera/capture source to internal feedback source for Osc cam/internal feedback PM
E. Motion recording
Turn on and off motion recording! When motion recording is enabled there will be an 8 second buffer that will record and loop all continuous input! Use this to sequence and automate every parameter to your hearts content!
G. toggle on/off wraparound distortion (amplitudes over 1 get wrapped around from 0)
H. toggle on/off foldover distorion (amplitudes over 1 get folded over from 1)
I. HD/SD aspect ratio switch
For use with the Capture Bundle supported HDMI usb input, this will switch the aspect ratio of the captured video to support 16:9
F. swap between viewing Osc0 and Osc1
J. Parameter reset/Motion recording clear
Resets all parameters to defaults and clears all motion recording.
m9. Osc0/Osc0_m square wave
r9. Osc0/Osc0_m saw wave
m12. Osc1/Osc1_m square wave
r12. Osc1/Osc1_m saw wave

If you appreciate the public domain open source software and educational materials I provide and can afford to spare some cash it is highly appreciated! The more donations I recieve the more time I have to spend on developing these resources! Please also consider subscribing to my patreon page as small amounts of regular income are appreciated as well! Or you could also support my ko-fi if you like getting stickers and stuff on a regular basis.